Bookbinding is one of the few crafts I have yet to think of trying. That ends today. I am currently taking a Spanish Class thru Spanish Blackbelt in Hoboken NJ. I have a private tutor in a small group with another woman. The interesting part is that our 'textbook' is provided via their website. So I can print out all the chapters and do the homework- No heavy book to carry around. At first I started using a binder to hold my chapters and work, but that became very heavy to carry around with me and not as transportable. I work in NYC and I rather not have to carry a binder with me 24/7, considering I wanted to have it with me a large majority of the time to work on it.
Over time I started just using sheets of paper folded in half. However, with the amount of work I was doing, it was causing a lot of mixing up papers and losing different things. It also made it hard to keep track of everything, what I did and didn't do. I started creating a check list. It was just a print out of a table that I could fill in with the information I needed (what I did, what chapter it was from, where I did it, what was the topic and if it was complete). This worked for a while, but not as well as I would hope. I then decided to create then print a cheat sheet that listed all the chapters and all the assignments. This way I could check them off. This was difficult seeing as all the paper still was getting mixed up or lost.
Last week I finally thought of a simple (sort of) resolution. I would transform the online text into a booklet. This would be perfect, I could make it the size of a folded piece of paper. This would also be perfect because my notebooks are also the same size. On to Pinterest I went.
There seem to be several different way to create a book/booklet. The first part is to figure out your content and print.
There are multiple ways to create your content. You can leave the pages blank, or print your content on the pages like I did. The easiest way to make this type of booklet would be using MS Word.
Steps on MS Word 2013:
- Open a new blank document.
- Go to Page Layout tab.
- Click the arrow on the bottom right hand side of the Page Setup box on the toolbar (this opens a new window),
- Change the Orientation to Landscape.
- Under Pages, for Multiple Pages chose Book fold. This will prompt another drop down- Sheets per booklet - choose All.
- You can also adjust the margins in this section as well, however you would have to chose the exact width of the margin you want. As an alternative-
- Close out of this window.
- Go back to the Page Layout tab.
- Click the left most icon in the Page Setup box on the toolbar. It is labeled as Margins.
- Chose which margins you would like. (I chose Narrow, then manually gave myself a little more space where the inside of the page will be, using the marks on the ruler.)
- ** To change your view of the document to show the ruler-
- Go to the View tab.
- In the Show box, click the box that says Ruler.
- Important notes:
- The way I set this up, all the way thru to the printing:
- The very first page of your document will be your cover (See picture on the right- first is how it will look on MS Word, the second is how it will print).
- The second page of your document will be the first page- the left side of the booklet (on the back of the cover-see picture on the right).
- The third page of your document will be the second page- the right side of the booklet.
- This continues- PLEASE NOTE: When printing (see next section)- it will print in a way that you can just fold the pages and they are in order.
- You are now ready to start adding your content.You can create your own content in the document or insert images you want to use. In my case, I used screenshots of the PDF file provided by my tutor. For this version, I decided that I wanted all the right sides of the open book, to be for notes on that chapter. So, I inserted lines on every other page.
- I separated all my chapters and made a separate section for the index/syllabus. For each of these, I created a new Word document. This way I can bind them within their chapters.

Once you completed your content and are ready to print:
- Go File - Print
- Choose your printer and Settings:
- Print all Pages
- Print on Both Sides (Flip pages on short edge).
- You can manually print on each side but please take note about how this will print from above.
Your booklet will print as follows (This one has a Front Cover, Back Cover and 10 Pages *the last 2- I left blank*):
- Page 2 - Side 1 - Page 2 & Page 9
- Page 2 - Side 2 - Page 3 & Page 4
- Page 3 - Side 1 - Page 4 & Page 7
- Page 3 - Side 2 - Page 5 & Page 6
For supplies, I quickly ran and found these simple things in the craft isle for less than $6.00.
- Fold each piece individually. If you fold them as a group, they will not be consistent and be slightly off.
- Create a template for punching the holes for sewing the pages together.
- Take a scrap paper the same size as you are using and measure out the spaces where you want to make your holes.
- Using another book, insert your page, then line up the template and punch holes accordingly. Using another book will allow you to make the holes in the crease where they are needed,
- Once you finish punching your holes, reorganize your sheets in the sections you want them to be divided by.
- At this point, I recommend following the tutorial provided by James Darrow via deviantart.com.
- My notes for using his method:
- He doesn't fully explain how to connect between the new sheets and the old. I just simply looped the thread around the previous sheet's loop.
- One of my issues with this tutorial is that it only attaches the ends to one another and the inside isn't. The result is pictured below.
- To resolve this issue, I tied a strand of lose thread to one end of the center loop. I then looped around every sheet on one end.
- This fully resolved the issue:
For the cover, there are several ways to go. I tried the following:
1. Using card-stock, cut out an 'inside cover'. This will be the same length as your binded sheets, but the width will be about 25% shorter on each side. Don't forget to measure the depth of your binded sheets. See diagram below.
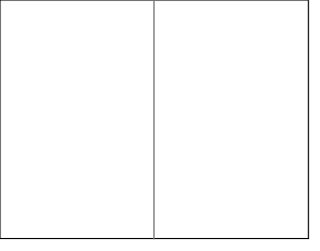
In the image to the right, you can see a sample of the original sheets that you folded to create your pages.
In this next image, it displays a red border- this will be your new cut lines for the card-stock. It also have two pink lines- these will be your fold lines.
To figure out how wide this inside bar will be, measure the thickness of your booklet. Divide that number in half, and then measure each side to that number.
For example, if your booklet is 1 inch thick, you measure .50 inch from the center crease.
To figure out the width of the larger width, take the size your individual pages and minus 25%. So if your individual pages are 4 inches wide, then the width of this card-stock will be only 3 inches wide on each side.
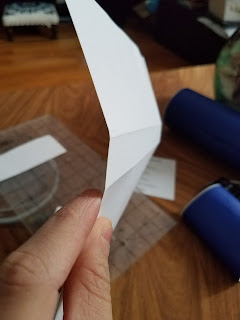
2. Using glue, (I used Fast Grab Tacky Glue) line the spine area of the cardstock. Also add glue to your thread areas on your binding sheets.
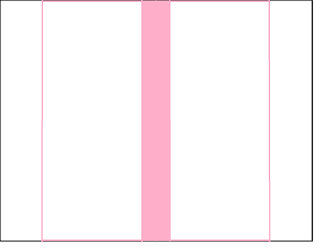
In the picture to the right, you can see the fold lines are now filled with pink. This solid bar will be the 'spine'. This is where you will add glue.

In the image to the right, you can see a sample of the original sheets that you folded to create your pages.
In this next image, it displays a red border- this will be your new cut lines for the card-stock. It also have two pink lines- these will be your fold lines.
To figure out how wide this inside bar will be, measure the thickness of your booklet. Divide that number in half, and then measure each side to that number.
For example, if your booklet is 1 inch thick, you measure .50 inch from the center crease.
To figure out the width of the larger width, take the size your individual pages and minus 25%. So if your individual pages are 4 inches wide, then the width of this card-stock will be only 3 inches wide on each side.

2. Using glue, (I used Fast Grab Tacky Glue) line the spine area of the cardstock. Also add glue to your thread areas on your binding sheets.

In the picture to the right, you can see the fold lines are now filled with pink. This solid bar will be the 'spine'. This is where you will add glue.
3. Glue the spine of the card-stock to the spine of your sheets. Be sure to apply pressure to the spine area.
To create the hard cover:
I reused a box made of cardboard. I was not completely thrilled with this. First off, it was not a firm as I would have liked. It also made indents and creases, which in turn, made it flimsy looking. Next time I will use 'bookboard' or the cheaper option 'chipboard.' I adapted this technique from the tutorial by James Darrow via deviantart.com. Instead of using fabric, I used adhesive vinyl.
Covering your cover:
1. To start, I measured the dimensions of the booklet. Using that info, I cut out three pieces of cardboard: A front cover, back cover and a spine. The front cover and back cover should be a few centimeters bigger than the size of an individual page. The spine should be the width as your spine above. The height should be the same as the covers.
2. I then measured out the vinyl to cover the inside part of the cardboard. I then covered each inside cover. and the inside of the spine. This was so that I wouldn't see the cardboard itself when the book is open.
3. Cut out vinyl for the cover- Now this was tricky. See diagram below.
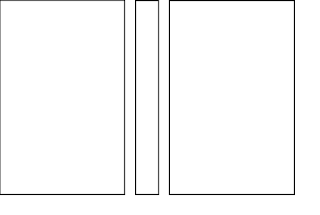 This is a simple diagram. At this point, the white space represents your hardcover (in my case, my cardboard that is shown above).
Lay out the three pieces (the covered pieces should be facing you so after this is complete, your cover will be completely covered).
Include about .25 inch between the spine and the covers.
Make sure your vinyl is wide enough to fold over the edges.
Starting by taking the backing off just half of the vinyl, then apply it to the cardboard. Make sure it is smooth and without bumps. Continue on, removing the backing as you go. This will make it easier to not get stuff on the parts you have not yet applied. Do not fold over edges just yet.
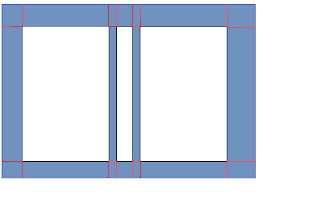
This next diagram shows where you should now cut the vinyl (shown in red).
Once you have cut these lines, your cover should resemble this image (to your right).
You can now fold over the edges onto the inside part of the cover.
Attaching the cover to the booklet:
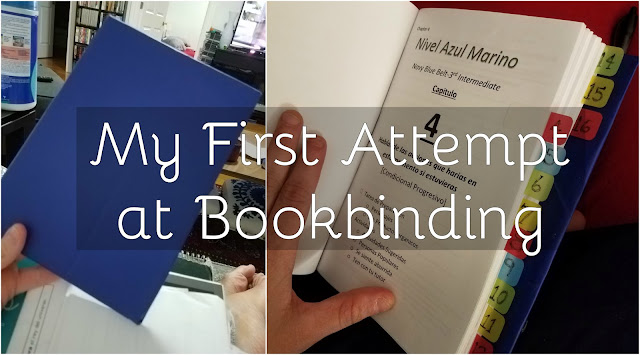
To finish off the book, I added chapter tabs. I used simple Post-It Tabs to mark each chapter.
The final result was not a complete disaster, considering this was my first try. There are several things that I realized:
To create the hard cover:
I reused a box made of cardboard. I was not completely thrilled with this. First off, it was not a firm as I would have liked. It also made indents and creases, which in turn, made it flimsy looking. Next time I will use 'bookboard' or the cheaper option 'chipboard.' I adapted this technique from the tutorial by James Darrow via deviantart.com. Instead of using fabric, I used adhesive vinyl.
Covering your cover:
1. To start, I measured the dimensions of the booklet. Using that info, I cut out three pieces of cardboard: A front cover, back cover and a spine. The front cover and back cover should be a few centimeters bigger than the size of an individual page. The spine should be the width as your spine above. The height should be the same as the covers.
2. I then measured out the vinyl to cover the inside part of the cardboard. I then covered each inside cover. and the inside of the spine. This was so that I wouldn't see the cardboard itself when the book is open.
3. Cut out vinyl for the cover- Now this was tricky. See diagram below.
 This is a simple diagram. At this point, the white space represents your hardcover (in my case, my cardboard that is shown above).
Lay out the three pieces (the covered pieces should be facing you so after this is complete, your cover will be completely covered).
Include about .25 inch between the spine and the covers.
Make sure your vinyl is wide enough to fold over the edges.
Starting by taking the backing off just half of the vinyl, then apply it to the cardboard. Make sure it is smooth and without bumps. Continue on, removing the backing as you go. This will make it easier to not get stuff on the parts you have not yet applied. Do not fold over edges just yet.

This next diagram shows where you should now cut the vinyl (shown in red).
Once you have cut these lines, your cover should resemble this image (to your right).
You can now fold over the edges onto the inside part of the cover.
At this point, you should have a completely colored cover. You may notice that there are 2 places that you have yet to cover (displayed as light blue in the picture on the right).
To resolve this, you can cut card-stock to cover these spaces. Or, as I did, more vinyl.
Attaching the cover to the booklet:
- Lay out your cover, flat on a hard surface. Apply glue to the spine of the cover and the spine of the card-stock (that is attached to the booklet). Attach the two together while apply pressure to hold.
- When it has attached, apply glue to the card-stock on the side that faces the cover. While the cover is laying flat, glue the card-stock sides to the inside covers.
- Using spare vinyl, cut a strip and apply (on the long side) to the ends of the card-stock that is now glued to the inside covers. This is to make it extra secure. Using a heavy object, apply pressure to the inside covers, while propping up the booklet's inside up straight (see picture below). This is to allow the glue to fully dry in the right shape.
To finish off the book, I added chapter tabs. I used simple Post-It Tabs to mark each chapter.
For the front cover design, I used my trusty Cricut. I uploaded the company's logo and created a cut file. I then used adhesive vinyl to add the front cover. I also shrunk the text and put it on the spine, along with a level number (6).
Thoughts:
The final result was not a complete disaster, considering this was my first try. There are several things that I realized:
- I should have used a firmer surface for the cover, rather than the cardboard. The cardboard made it look flimsy (pictured right).
- Next time I will use 'book board' or 'chip board'. They provide a smooth surface and do not easily bend. The edges will also be smoother.
- I hand cut my covers, which made them imperfect. I am a perfectionist, so I wasn't completely happy with them not being consistent.
- I wanted to add a bookmark into the spine, but forgot.
- Next time I will use a strip of ribbon, maybe even two, while I am gluing the spine.
- There was a big gap (pictured right) after I glued the card-stock to the cover. I am not too sure why this happened, I am thinking there was too much space between the spine and back cover. Next time, I will try less space here
- A lot of the supplies I used were just what I found very quickly. I think that the thread I used may have been a little thick for this project.
- On one side, the thick thread made it easier to bind to the cover.
- On the other side, since I was using normal printer paper, I felt this thread could rip the paper easily, however it didn't.
- I did like the wax thread, it seemed to work well for the project.
- The pen I used to number the tabs was not as efficient as I would have liked. It required a lot of rewriting. Next time, I will use a sharpie or just cut numbers via my Cricut.
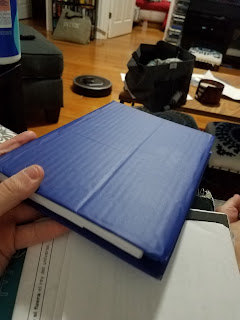


That's beautifully done Nean. I've just finished making a "medieval" journal for my son and my binding doesn't look half as good as what yours does. It was fun though and I've have a whole new respect for book binders
ReplyDeleteOh wow! I tried book binding only once, and I know it is easy to mess it up. Yours turned out awesome - great job!!
ReplyDelete